How to Use Snipping Tool to Take a Screenshot on windows
Sometimes you need to take a snapshot to copy words or images from all or part of your PC screen. You can use Snipping Tool to make notes or changes, then save, and share them.
Windows 10 has another screenshot app you might also like to try. When you open Snipping Tool, you’ll see an invitation and keyboard shortcut to Sketch and Snip.
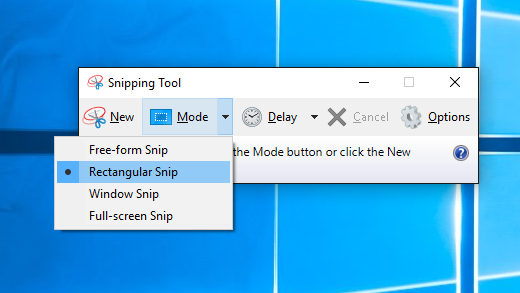
Capture any of the following types of snips:
| Free-form snip | Draw a free-form shape around an object. |
| Rectangular snip | Drag the cursor around an object to form a rectangle. |
| Window snip | Select a window, such as a dialog box, that you want to capture. |
| Full-screen snip | Capture the entire screen. |
When you capture a snip, it’s automatically copied to the Snipping Tool window where you make changes, save, and share.
Snipping tool download: You needn’t download it. Windows has this tool.
How to open Snipping Tool Windows 7/8.1/10
- For Windows 10: You select the Start button, then you type snipping tool in the search box on the taskbar, and then you select Snipping Tool from the list of results.
- For Windows 8.1: You swipe in from the right edge of the screen, then you tap Search (or if you’re using a mouse, point to the lower-right corner of the screen, move the mouse pointer up, and then select Search), you type snipping tool in the search box, and then you select Snipping Tool from the list of results.
- For Windows 7: You select the Start button, then type snipping tool in the search box, and then you select Snipping Tool from the list of results.
Work with your screenshots
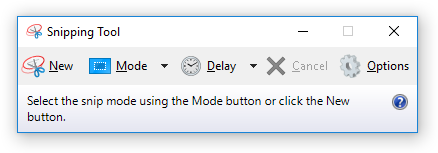
With your Snipping Tool open, you select one of the following to create and work with your screenshots.
1.
In Snipping Tool, you select Mode. In earlier versions of Windows, you select the arrow next to the New button. Next, when you choose the kind of snip you want, you will see the whole screen change slightly to gray. Then, you choose from anything currently displayed on the screen, you select the area of your screen that you want to capture.
- After you open Snipping Tool, you open the menu that you want to capture. For Windows 7, you press the Esc key before opening the menu.
- You press Ctrl + PrtScn keys. The entire screen changes to gray including the open menu.
- You select Mode, or in earlier versions of Windows, then you select the arrow next to the New button. You select the kind of snip you want, and then you select the area of the screen capture that you want to capture.
- Alt + M: To choose a snipping mode
- Alt + N: To create a new snip in the same mode as the last one.
- Shift + arrow keys: To move the cursor to select from different types of snips.
- Alt + D: To delay capture by 1-5 seconds
- Ctrl + C: To copy the snip to clipboard
- Ctrl +: To save the snip
Tag: snipping tool download, snipping tool windows 10
Facebook Comments